

VR Advanced Guide – for facilitators
This guide is for people facilitating a session in the VR room – it covers the additional things that we think facilitators need to know (i.e. in addition to the VR Basics Guide). We really hope you enjoy the experience of hosting an event in Frame and find it straightforward. The following guidance is aimed at helping you to make effective use of the VR room and will guide you through the process of accessing the room, adding and editing resources in the room, and reviewing the attendance after your event.
Using any platform for the first time can take a little time to get used to, but Frame also has considerable guidance online if you need further help (see support.framevr.io).
Page shortcut (i.e., links to items on this page):
- Recomended Teaching
- Accessing the VR room
- The Taskbar
- Adding 3D models
- Adding to the inventory
- Uploading Documents
- Setting up polls
- Setting up a whiteboard
- Editing Assets
- Attendance
Recommended teaching approach
If you’re hosting a tutorial, teaching in Frame feels a little different from Adobe Connect. It’s a less formal and more interactive environment. Generally, it’s bright and colourful and that makes it more visually interesting. There are a few key pointers which help to make a really good interactive session.
Assume your students will talk – microphones are automatically on in the room.
- Avoid using the chat facility – it’s there but much more secondary than in Adobe Connect.
- Make use of spatial audio – groups of students can talk to each other and will only be faintly heard by students further away in the room.
- Don’t rely on a PowerPoint presentation – a couple of instruction slides can be good but Adobe Connect might work better for a full presentation.
- Make use of 3D models as a teaching tool – they’re visual and something a bit different for the students.
- Try to have a more relaxed conversational style and keep it fun.
- Don’t try to teach too much in one session, 30 mins is good – be clear about what you want to achieve at the beginning of the session and do a recap to explain how that’s been achieved at the end.
- Students generally prefer learning to be tutor-led, but small groups can work well if there is more than one person facilitating the session.
Accessing the VR room
You should have been provided with a link to access the VR room using your web browser, if not please contact one of the VR Team to request the link.
If you are a member of the LHCS VR tutorial group, use your email address to enter the room. Otherwise, you can enter the room as a guest. We recommend tutors access the room as ‘Members’ and students access the room as ‘Guests’.
If you are not a member and you want more functionality within the room (e.g., to upload 3D models), contact one of the VR Team to request becoming a member of the LHCS VR tutorial group.
The taskbar
Once you’re in the room you should see a black taskbar at the bottom of your screen.
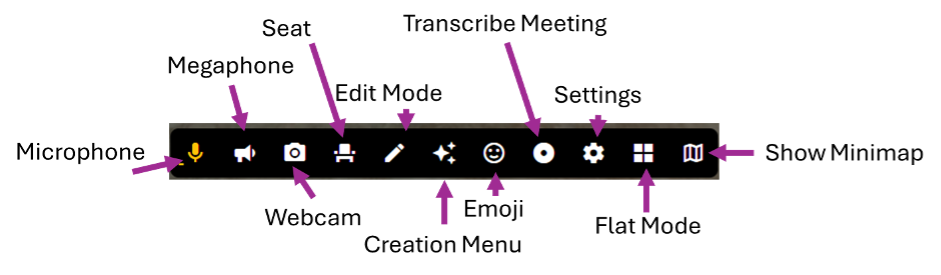
The microphone, megaphone, webcam, seat, emojis, settings and flat mode buttons are available to everyone and are described in the ‘VR Basics’ page. In the following sections, we explain the additional functionality available to members. It’s really worth spending some time exploring all the options you have available here.
Adding 3D models
If you have a .glb file you can upload that via the ‘Creation menu’ (three stars icon).
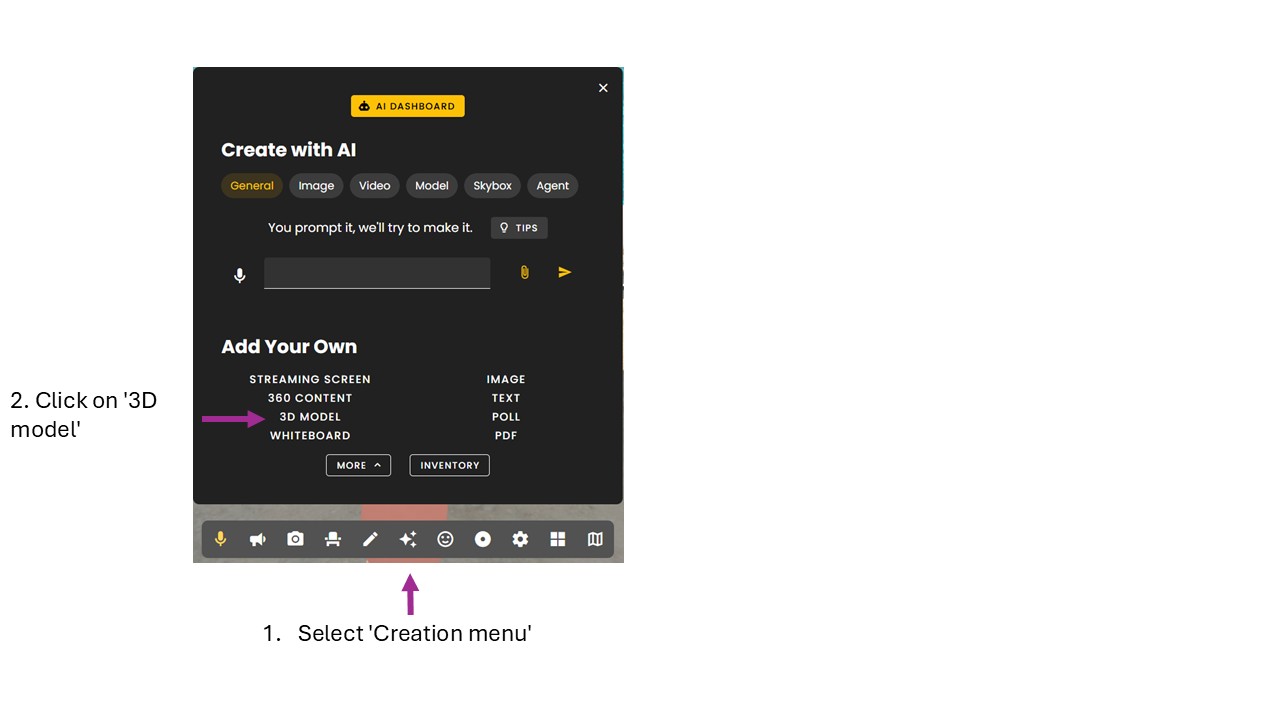
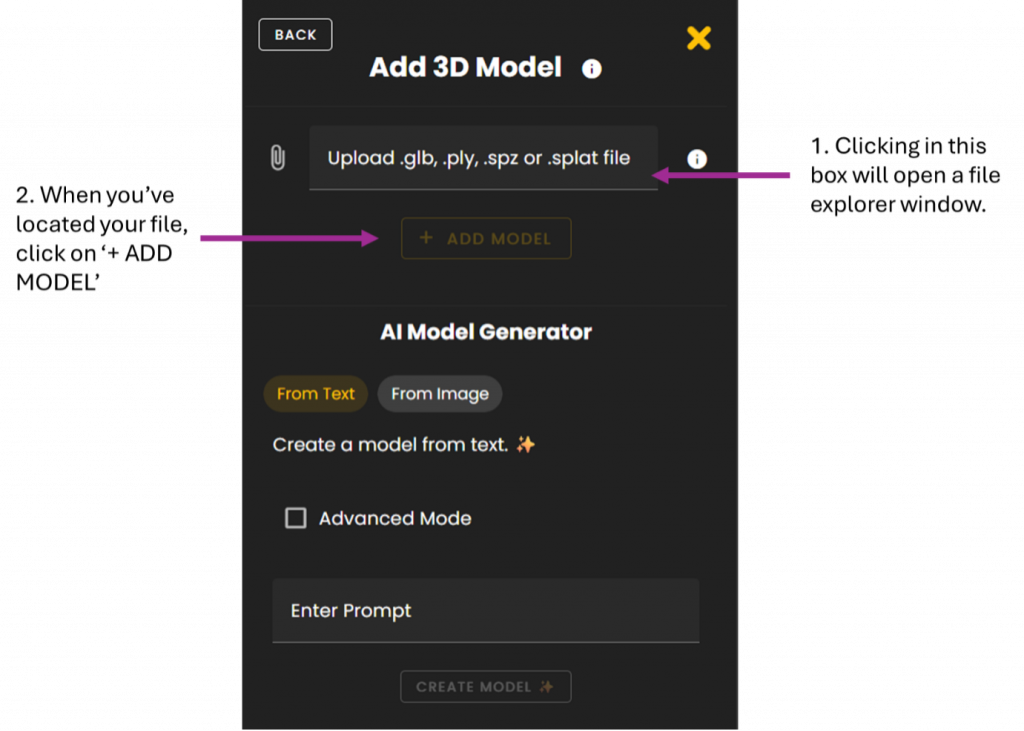
You can search for your model and then click ‘+ ADD MODEL’ (see below).
Adding to the inventory
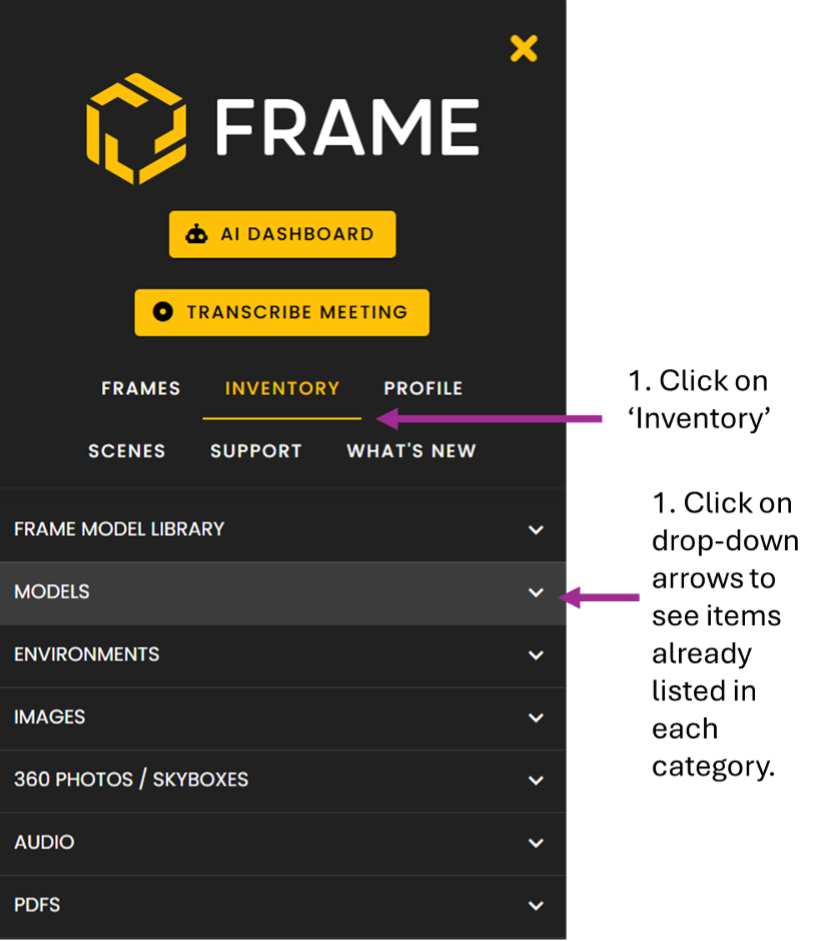
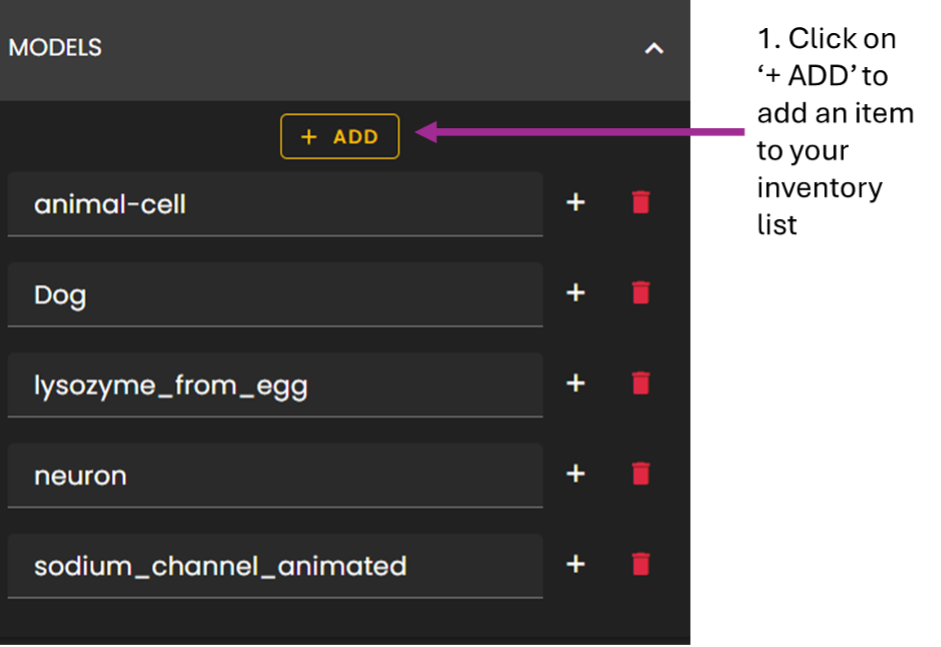
When you click the icon in the top right-hand corner of the screen, you can select ‘Inventory’ and see a list of items stored on an inventory list. Click on ‘+ ADD’ to add an item to your list. This is useful if you’re likely to want to use an item multiple times.
Uploading documents
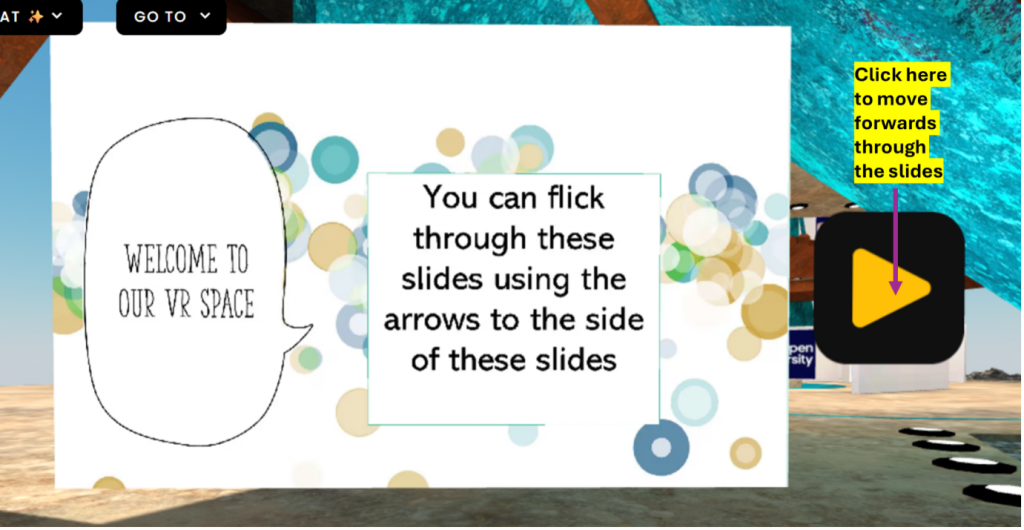
Please note, you can’t use PowerPoint directly in FrameVR but you can convert PowerPoint slides into a PDF and upload them into the room. You can navigate through slides / PDF pages by clicking on the arrows either side of the slide.
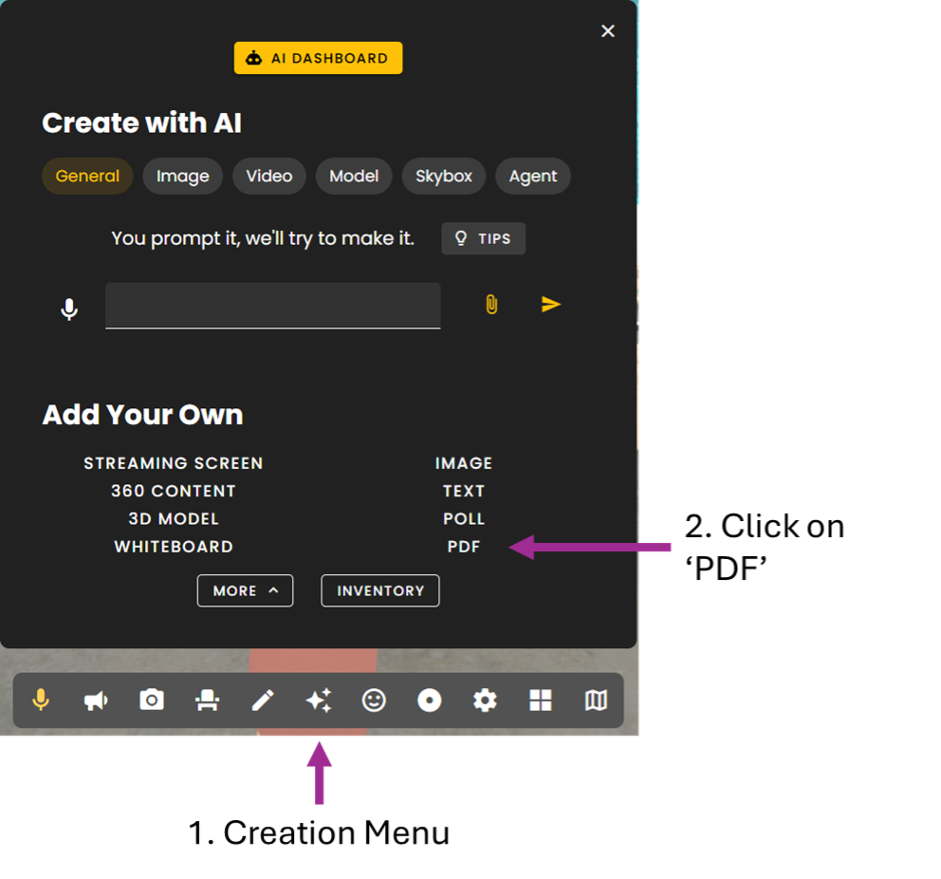
To upload a PDF, navigate via the Creation Menu as before.
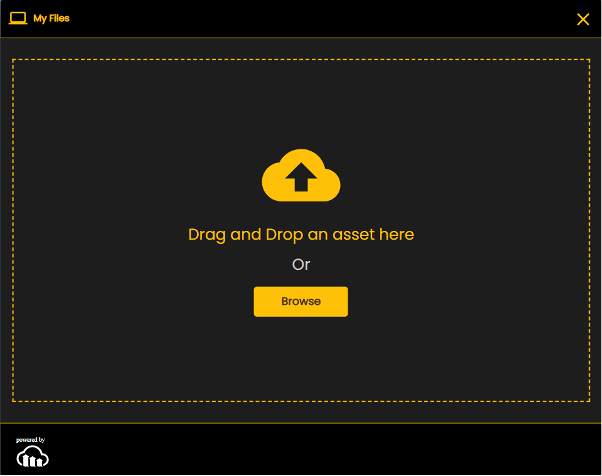
A box will then appear to allow you to drag and drop your PDF file or to browse.
Please note that image files can be uploaded in the same way, by clicking ‘IMAGE’ in the Creation Menu.
Once your file has loaded, you can navigate through it using the arrow keys.
Setting up polls
Polls are a fun way of asking your participants a question, which appears as a free standing panel within the VR environment.
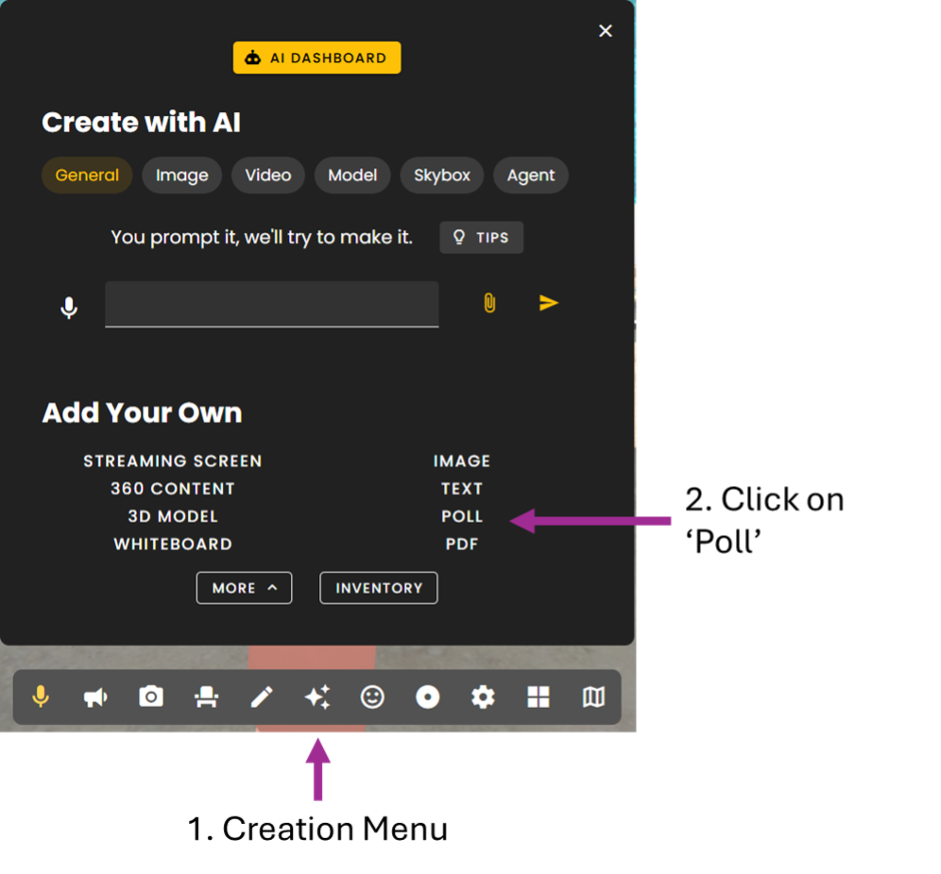
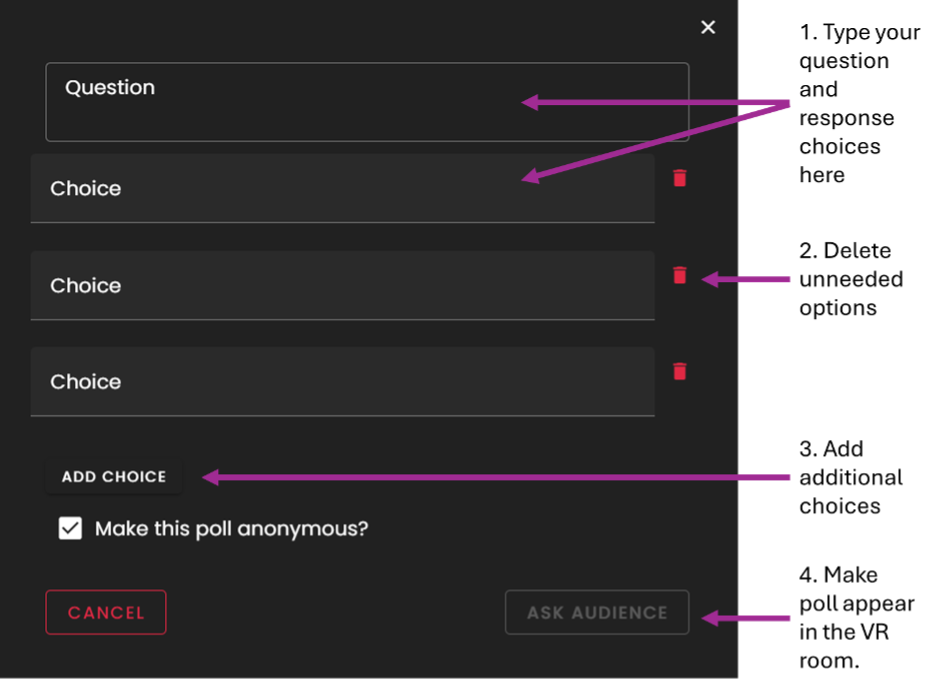
You can simply type in a quick question and give participants a choice of responses. Click on ‘ASK AUDIENCE’ to make the poll appear.
Setting up a whiteboard
Whiteboards can be a fun way of asking participants to write or draw in the room (although it’s not easy to do it well!). As before, whiteboards can be accessed via the Creation Menu (see below).
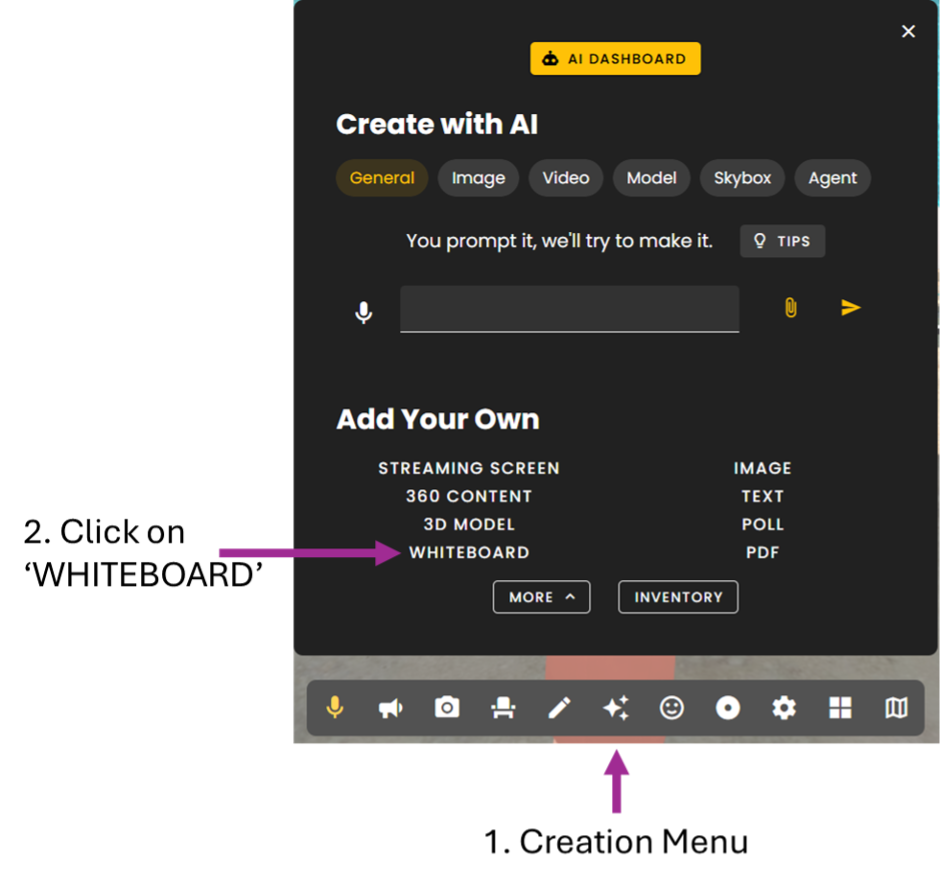
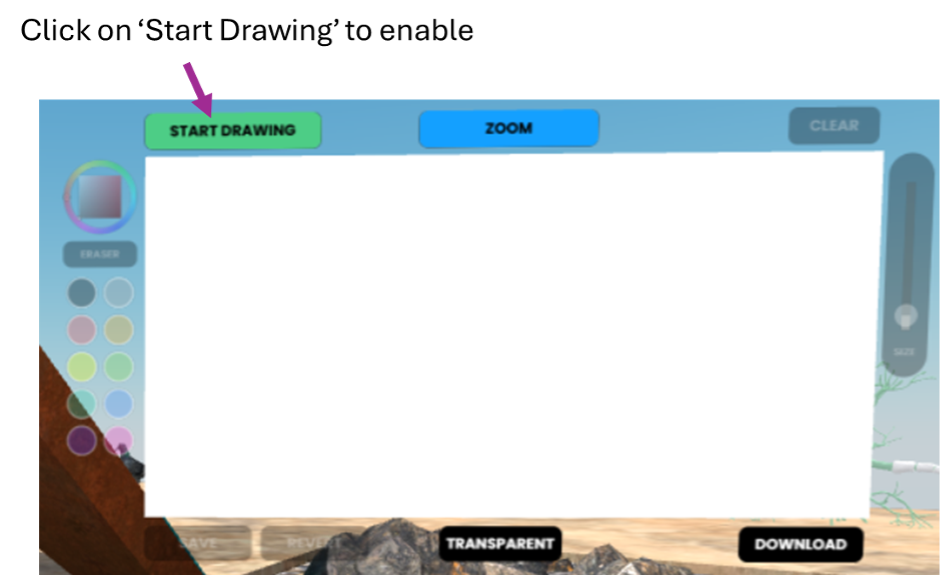
Once you have clicked on ‘WHITEBOARD’, a whiteboard will appear in your environment. To start drawing, click on ‘START DRAWING’.
Please be aware that the whiteboard will appear blank when attendees enter the room, regardless of whether there is anything on it. This means that people arriving late might inadvertently draw over something someone else has written on the whiteboard. This means that you can’t ask people coming into the room to look at something that has previously been drawn or written on the whiteboard, because they won’t be able to see it.
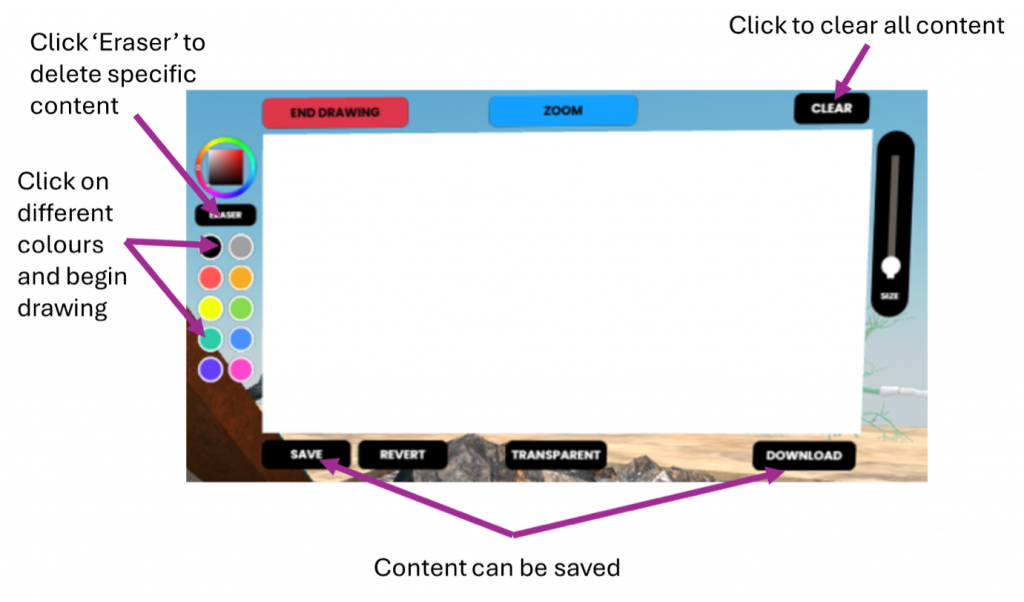
Once you have clicked on ‘START DRAWING’, the menu of colours will then become clearer on the left-hand side of the whiteboard. You can then just click on a colour and start drawing on the screen using your mouse or touchpad. Other features of the whiteboard are shown above.
Editing assets
Once you have created an asset (i.e., a 3D model, poll, pdf, image or whiteboard), you may want to change it’s position, orientation or size. To do this:
- Click ‘Edit Mode’ on your task bar at the bottom of the screen.
- Click on the asset you wish to edit.
For example, if you click on ‘Edit Mode’ and a whiteboard you created, you will see this:
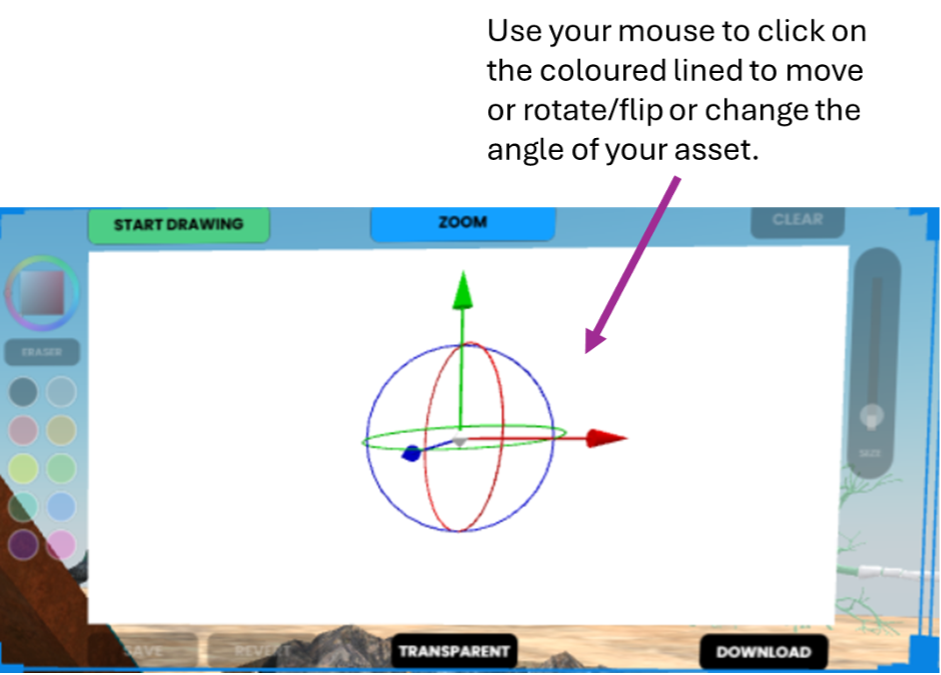
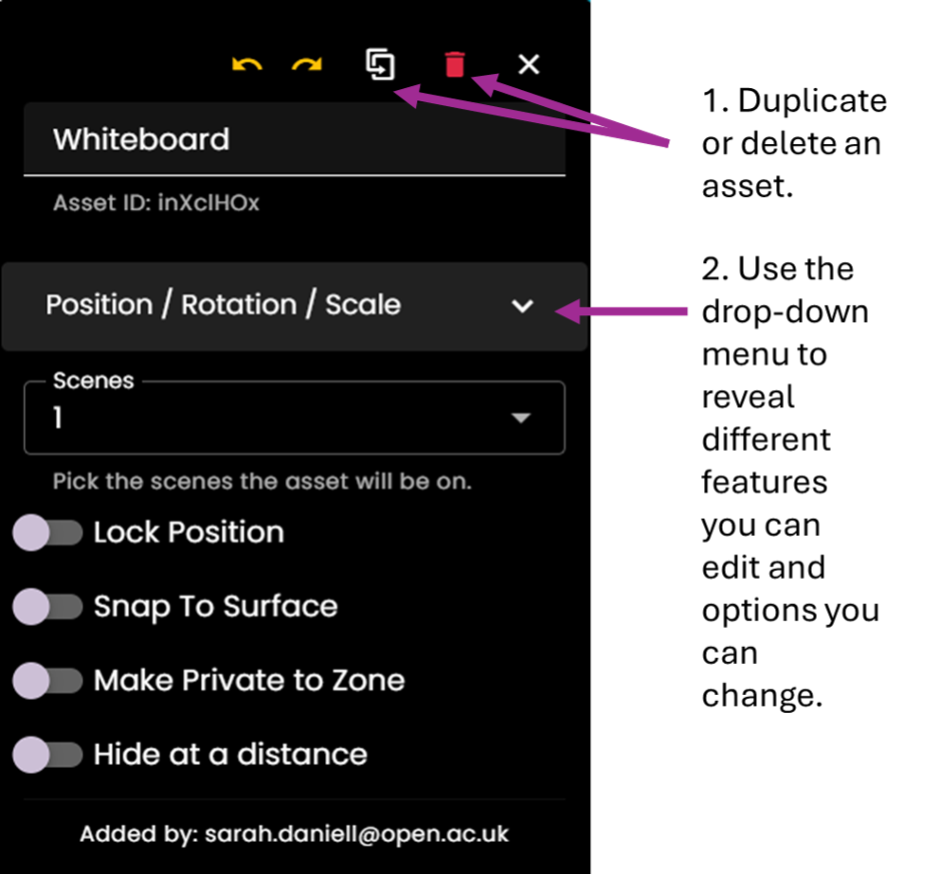
You can click on the coloured arrow keys to move the position of the item, or rotate it by clicking and dragging on the blue, red or green circles. You can expend or reduce the size of your object by dragging it to enlarge or reduce its size. Alternatively, a box will also appear, usually in the bottom left corner of the screen to enable you to edit your asset.
Attendance
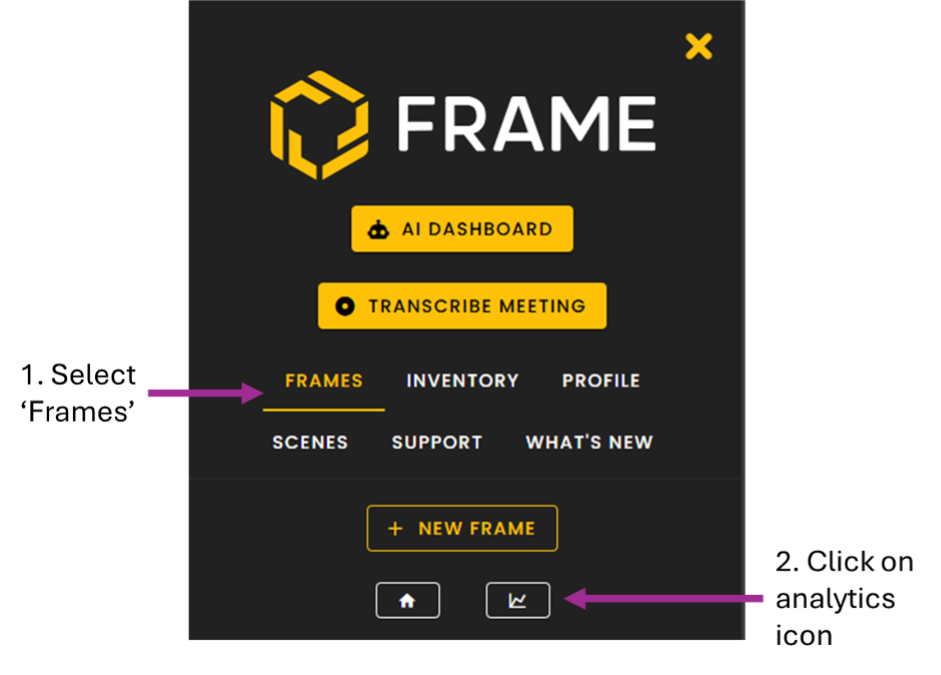
To see how many attendees you had at an event, you can use the Frame analytics function. To access this, go to the top right-hand corner of the screen and click on the three horizontal lines button to bring up the main menu:
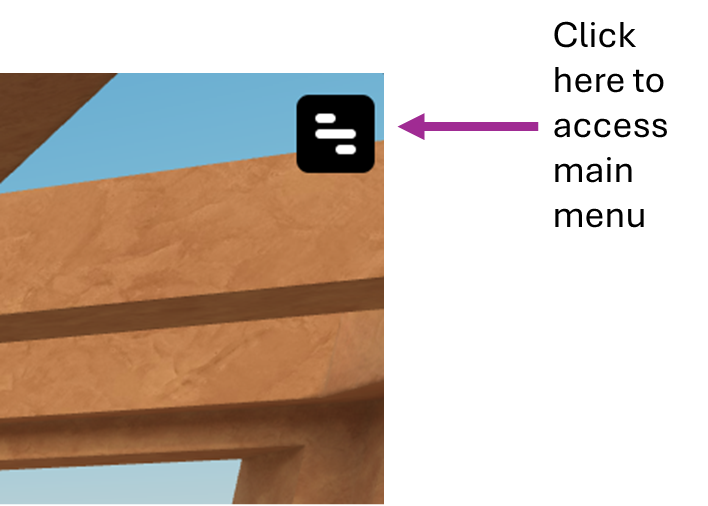
Then click on the analytics icon as shown below:
You will then be able to access a series of options to analyse interaction within your VR session and the number of attendees: You can download the plot by clicking the two horizontal lines at top right of the image, or export the data by clicking “Export CSV”. If you choose to export the data you will be downloading email addresses from everyone who has signed in during the time period you have selected. Please therefore only download data which covers the period of your FrameVR session and ensure that data is used and deleted in accordance with the OU’s GDPR policy.